Introduction
HIV, the virus that causes AIDS (Acquired Immune Deficiency Syndrome), is a significant public health concern worldwide. Testing for HIV is crucial for early detection and timely intervention. The iCARE HIV 1&2 Home Use Rapid Test Kit (Oral Swab) offers a private, convenient, and rapid method for individuals to determine their HIV status in the comfort of their homes.
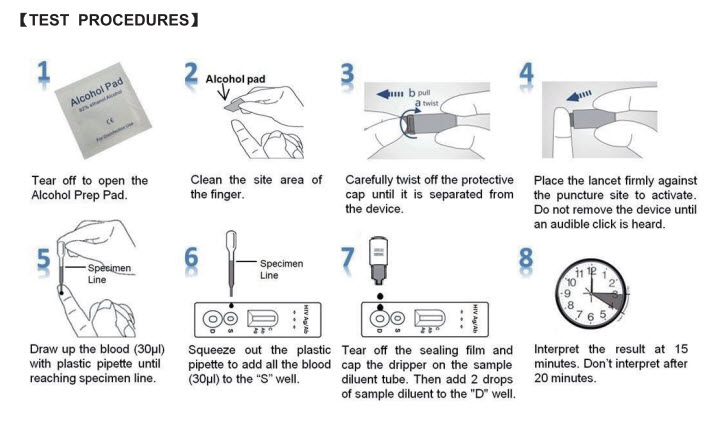
In this guide, we’ll provide a detailed step-by-step illustration of how to use the iCARE HIV 1&2 Home Use Rapid Test Kit effectively.
Step 1: Read the Instructions
Before conducting the test, carefully read the instructions provided with the iCARE HIV 1&2 Home Use Rapid Test Kit. Familiarize yourself with the components of the kit and the recommended procedures for accurate testing.
Step 2: Prepare the Test Kit
Gather all the necessary components included in the HIV 1&2 Home Use Rapid Test Kit. Ensure that the WHO PQ LISTED HIV 1&2 RAPID TEST kit is unopened and within its expiration date. Lay out the components on a clean, flat surface.
Step 3: Collect Oral Mucosal Transudate
Using the provided oral swab, gently swab the inside of your mouth to collect oral mucosal transudate. Avoid touching the swab with your hands or any other surfaces to prevent contamination.
Step 4: Apply Specimen to Sample Pad
Carefully insert the oral swab containing the collected specimen into the designated sample pad on the WHO PQ LISTED HIV 1&2 Rapid Test device. Ensure that the specimen is applied to the sample pad as per the manufacturer’s instructions.
Step 5: Wait for Results
After applying the specimen, wait for the specified time indicated in the instructions, usually around 15 minutes, for the test results to develop. Avoid moving or disturbing the WHO PQ LISTED HIV 1&2 Rapid Test device during this waiting period.
Step 6: Interpret Results
Once the specified waiting time has elapsed, visually inspect the test device for the presence of colored lines. A purplish/red “T” line appearing in the test area indicates a positive result for antibodies to HIV-1 and/or HIV-2. Absence of the “T” line suggests a negative result.
Step 7: Verify Control Line
Check the control line (labeled “C”) to ensure the validity of the test. A purplish/red “C” line should always appear, indicating that the test device has functioned correctly. If the control line is absent, the WHO PQ LISTED HIV 1&2 Rapid Test result is invalid, and the test should be repeated.

Step 8: Interpret Results
If the test result is positive for HIV antibodies, it is essential to consult a healthcare professional immediately for confirmatory testing and appropriate follow-up care. A positive result does not necessarily mean a diagnosis of HIV infection and requires further evaluation by a healthcare provider.
Conclusion
The iCARE HIV 1&2 Home Use Rapid Test Kit offers individuals a convenient and reliable method for testing their HIV status in the privacy of their homes. By following the step-by-step guide outlined above, individuals can perform the test accurately and interpret the results effectively. Early detection of HIV is crucial for timely intervention and access to appropriate medical care.
Why and Who Should Test For HIV?
HIV is a virus that can affect anyone, regardless of age, gender, or sexual orientation. Testing for HIV is essential for individuals who engage in high-risk behaviors, such as unprotected sexual intercourse or intravenous drug use. Additionally, individuals with a history of potential exposure to HIV, such as through unprotected sex with an infected partner or sharing needles, should undergo regular HIV testing. Early detection of HIV allows for timely access to medical care, treatment, and support services, ultimately improving health outcomes and reducing the risk of transmission to others.

